
I've been using Tails (a privacy-focused Linux distro) as my day-to-day operating system recently, and I was disappointed to find that Ricochet IM does not work out-of-the-box.
(If you're interested in learning more about how Ricochet works, I wrote a post about that recently.)
Tails firewalls all access to the internet so that no application can accidentally do any non-Tor networking that might give your identity away. Ricochet tries to run its own Tor process (separate to the system Tor process) in order to run its hidden service. In the default configuration, this Tor process tries to access the internet directly, which is of course blocked by the Tails firewall. This isn't a big problem, we just need to configure it to proxy via the system Tor process.
The problem is that when Ricochet starts its own Tor process, it communicates with its control port using TCP over the loopback interface on an unpredictable port number. In order to reduce the attack surface, the Tails firewall blocks all non-essential networking, including access to the loopback interface.
My work-around for this was to add a firewall rule that allows the Tails user to access anything on the loopback interface. This weakens the Tails security model, so only do it if you're more interested in using Ricochet than having a secure system. Things that might be accessible over the loopback interface include the control port for the system Tor process, so relaxing this rule is not to be taken lightly.
Walkthrough
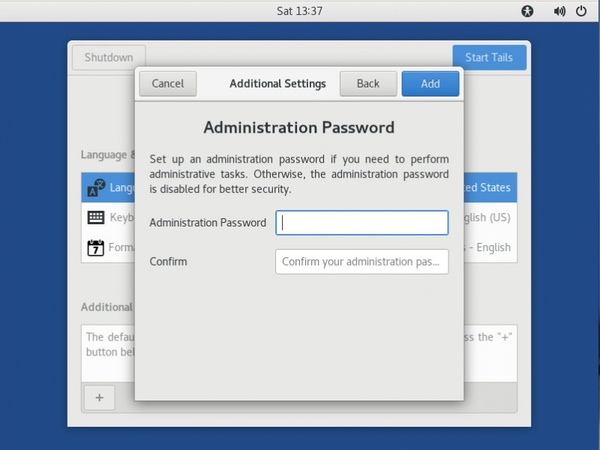
1. At boot time, enable the admin password
You'll need an admin password both for installing Ricochet and for altering the firewall rules.
At the little login screen that Tails boots to, click the "+" under "Additional Settings", and set an administrator password.
2. Install ricochet-im
$ sudo apt update && sudo apt install ricochet-imThis will take a little while, depending on how lucky you got with the Tor relay selection. Some are quite slow.
If you have encrypted persistent storage configured, and you want to use Ricochet more than once, you might want to choose "Install Every Time" when Tails pops up a message asking you if you want it installed automatically every time the system boots.
3. Allow the amnesia user to access anything on localhost
$ sudo iptables -I OUTPUT --out-interface lo --destination 127.0.0.1 --protocol tcp --syn --match owner --uid-owner 1000 --jump ACCEPTAgain: This weakens the Tails security model, so only do it if you're more interested in using Ricochet than having a secure system.
I copied most of this line from the default Tails rules, but remove the port number so it allows access to all ports. Note that it begins -I rather than -A. This is because we need this rule to be inserted at the start, so that it comes before the "default reject", instead of after.
The reason this has to allow access to every port rather than just one specific port is that Ricochet has its Tor process choose a control port at random. Changing this to use a constant port number would be better for use on Tails, but would require modification of the Ricochet source. It's a trivial modification! But it's not one that is shipped from apt, so it's a bit inconvenient.
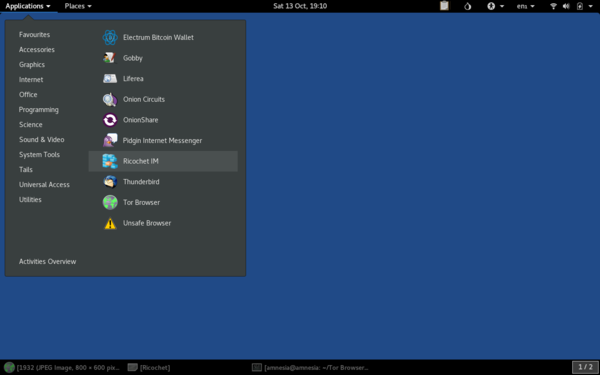
4. Start Ricochet
Either from the system menu:
Or by running ricochet from a terminal.
5. Configure Ricochet to proxy via the system Tor instance
Our firewall change only relaxed access to localhost, so internet access still needs to be proxied via the system Tor process.
Select "Configure" instead of "Connect" at the Ricochet startup screen (if Ricochet starts without prompting, click the little Settings icon and find the Tor settings). Then set the proxy to localhost:9050:
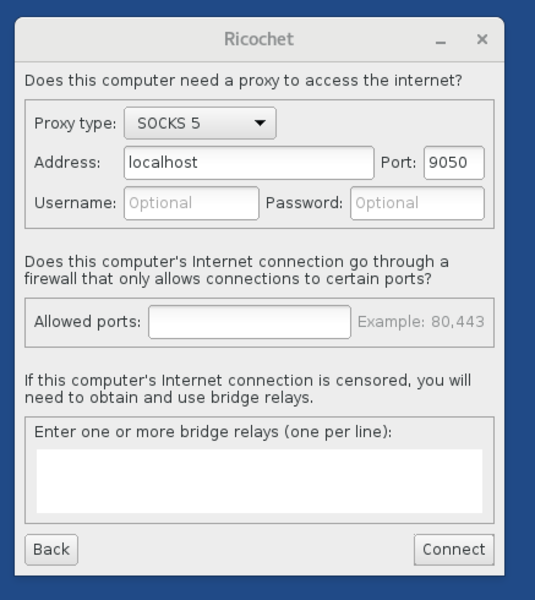
And then you should be up and running!
6. Persistence
The above is perfectly adequate for a throw-away Ricochet instance, but if you want to keep your contact list, keep a static Ricochet ID, etc., you'll want to link it in to your encrypted persistent storage.
(If you don't already have encrypted persistent storage configured, but you want to use it, you'll have to work out how to do that on your own).
6.1 Ricochet package
Install ricochet-im and have Tails add it to the list of "Additional Software", if you haven't done so already.
Now every time you boot Tails with the persistent storage unlocked, Ricochet will be installed automatically. This takes quite a few minutes, but Tails eventually pops up a dialog to tell you it is ready, and then it's accessible from "Internet" under the "Applications" menu.
6.2 Ricochet config
In addition to installing the Ricochet program, you'll also want your Ricochet configuration to appear automatically.
I did this using the "dotfiles" feature of the encrypted persistent storage, so make sure you have that enabled (under "Applications", "Tails", "Configure Persistent Volume"):
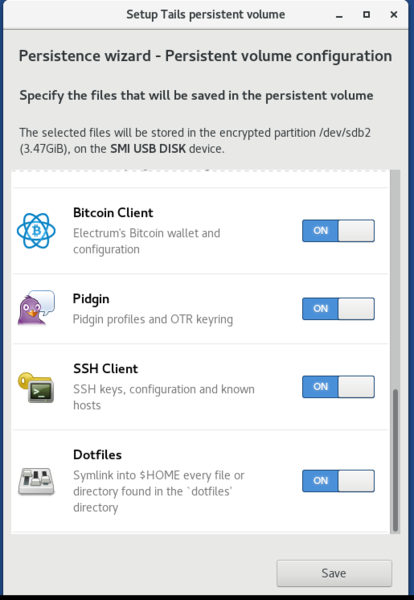
For the initial setup, we can just copy the Ricochet files into the "dotfiles" directory and then reboot the machine. On subsequent boots, the files will be symlinked into place. Stop Ricochet first, to make sure the directory is in a consistent state, and then:
$ mkdir -p /live/persistence/TailsData_unlocked/dotfiles/.local/share/Ricochet/ricochet/
$ cp -a ~/.local/share/Ricochet/ricochet/* /live/persistence/TailsData_unlocked/dotfiles/local/share/Ricochet/ricochet/
For avoidance of doubt: note that if you copy the Ricochet files into the "dotfiles" directory, and then start Ricochet again and add some more contacts, those contacts will be gone next time you boot, because you only copied a snapshot of the config. Next time you boot it will be a symlink so it will stay up to date on its own.
6.3 Firewall rules
I added a shell script under ~/Persistent to setup the firewall rules:
$ cat ~/Persistent/ricochet-firewall
#!/bin/sh
sudo iptables -I OUTPUT --out-interface lo --destination 127.0.0.1 --protocol tcp --syn --match owner --uid-owner 1000 --jump ACCEPT
6.4 Usage
When you want to use Ricochet, you need to boot Tails with the admin password enabled, so that you can setup the firewall rules. Tails will automatically symlink in your Ricochet config, and will automatically install Ricochet. While it's installing Ricochet (or, right before you want to use Ricochet), you can run:
$ Persistent/ricochet-firewallOnce more: This weakens the Tails security model, so only do it if you're more interested in using Ricochet than having a secure system.
It will produce no output (other than prompting for the admin password), but the iptables rule will be added which will allow Ricochet to work.
So that's how I use Ricochet on Tails. Bit hacky, and it weakens the security a bit, but it works for me and maybe it will work for you too.