
The Earth rotates around its axis at a rate of ~360°/day, or ~15°/hr (it's actually slightly slower than this because "1 day" is the amount of time it takes for the sun to come around again, but we are also moving around the sun, so we don't need to rotate a full 360° per day). When zoomed in with a field-of-view only 0.25° wide, objects that are not very close to the North star appear to move quite quickly across the frame. For this reason, my telescope control software continually updates the coordinates that it wants to point at, in order to keep the scope pointed at the same part of the sky.
But any error at all in any part of the axis alignment or base levelling will cause the image to drift away over time. Manual intervention is required to periodically re-centre the object. This post is about how I fixed this in software by auto-guiding the scope based on the image from the camera.
1. Tracking error
Before thinking about auto-guiding we should try to characterise the sources of error that already exist.
1.1. Error shown in the images
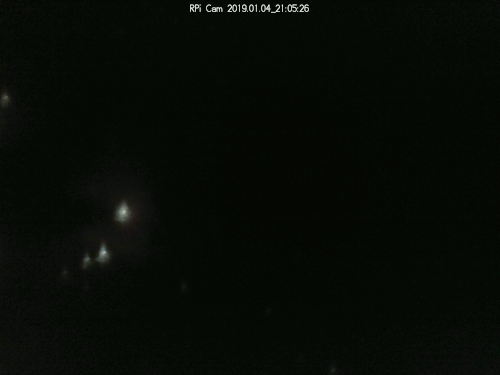
With the tracking turned off, the target object is not in the frame for very long:
Fig. 1: Orion nebula with tracking off, 60 seconds.
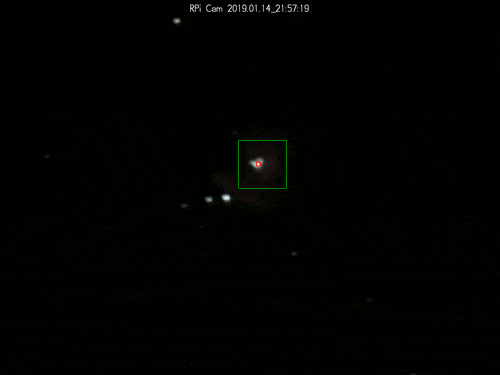
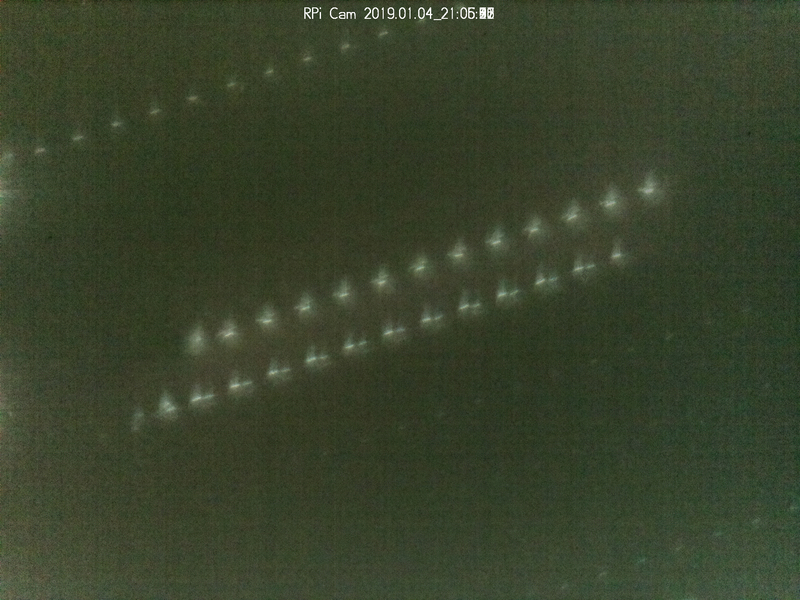
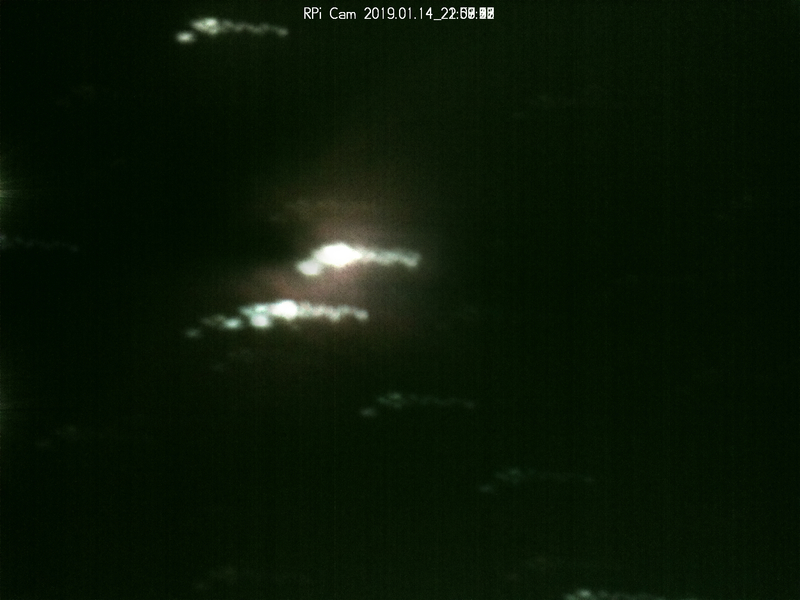
In 60 seconds, the subject moved almost all the way across the frame! With tracking turned on, we do better:
Fig. 2: Orion nebula with tracking on, 4 minutes (cf. fig. 1).
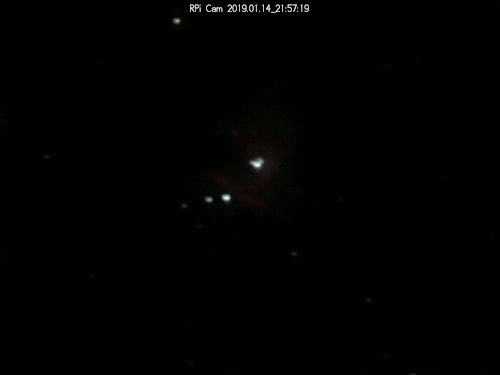
It's still in the frame after 4 minutes, although it is not in the same place, and it would eventually drift out.
I manually checked the pixel coordinates of the main star in the nebula for each frame in both of these timelapses to show how the image moves in the frame over time. The "tracking error" value on the y axis is the radius from the starting location, i.e. sqrt(xoffset2 + yoffset2).
Fig. 3: Tracking error with tracking off versus on.
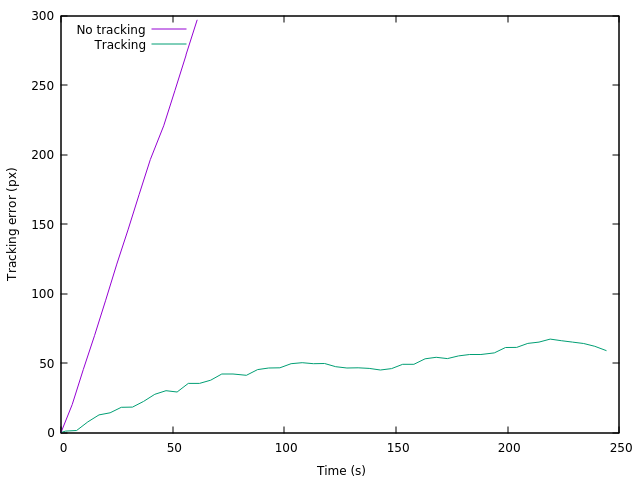
(I scaled the original 2592x1944 images down to 500x375 to make them easier to work with, so the pixel distances reported here are also scaled down relative to the full-size images).
We can see that the "no tracking" case slides away quite quickly, while the "tracking" case slowly drifts away.
1.2. Error caused by the motors
While the slow drift is a result of mechanical misalignment (of the rotation axes or the base or both), there is also a small amount of "jitter". This jitter is caused by not being able to place the motors at exactly the location we want to place them. Partly because the step resolution is not sufficiently fine-grained, and partly because the motor undershoots or overshoots the target and it takes time to correct that.
I didn't have any data for the tracking error from the motors, so I set the telescope up on my desk in the daytime and configured it to track the Orion nebula for 5 minutes in order to gather data on how far away the actual motor positions are from the targeted positions.
Fig. 4: Tracking error of motor step counts.
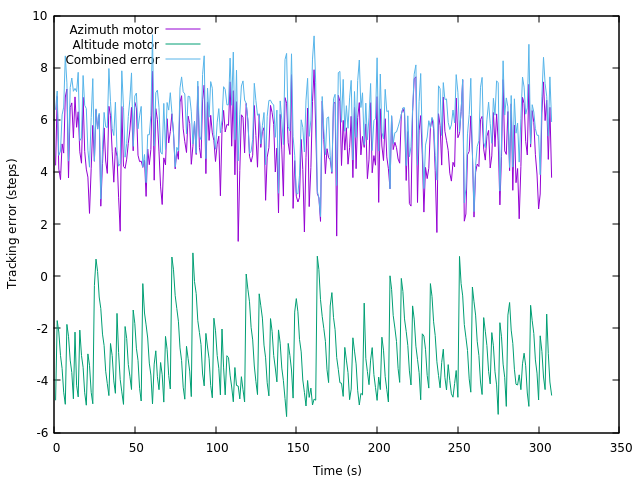
There are two effects demonstrated here. Looking particularly at the azimuth motor:
1.) There is a non-zero steady-state error of an average of 5.1 steps. I think this is because I've recorded the difference between the instantaneous desired target position and the current position at the same instant, and it takes time for the motors to move to the new target. We could correct for this by simply adding the mean tracking error to the target step count, but since this value doesn't cause either jitter or drift, it's not a big deal.
2.) There is jitter around the mean error. The standard deviation (i.e. the variation that ~2/3 of data points lie within) is 1.4 steps. This is remarkably good given that the motor controller only tries to target to the nearest 4 steps! These are DC motors, not steppers, so anything smaller than that is too hard to hit exactly. The reason the standard deviation is better than 4 steps is because the motion (over a short time period) is all in the same direction, so the motor just has to periodically spin up and move roughly the same number of steps in roughly the same direction. When it overshoots the target point, it just waits, and the error reduces over time on its own as the desired target point changes.
If the altitude motor is at 0° (i.e. the telescope is parallel to the ground, where the azimuth motor has the largest effect), then a deviation of 1.4 steps on the azimuth axis would manifest as about 4 pixels of deviation on the x axis of the output image (at 500x375).
The mean tracking error observed in the image was 42 pixels, with standard deviation of 18 pixels. So error from imprecise motor positioning was not the dominant force even over only a 5-minute time period. That's good, because it's annoying and expensive to upgrade the motors, but it's fun and cheap to write auto-guiding software!
2. Auto-guiding
The idea of auto-guiding is that we want software to continually monitor the image from the camera, and as it starts to drift in one direction or another, we want it to adjust the trim on the motors to keep the image in the same place. This may sound like a bodge, but it is a legitimate solution and is used even on top-end telescopes. Admittedly, top-end telescopes track better without auto-guiding than mine is ever likely to track even with auto-guiding. But that's not the point.
From what I've been able to gather, auto-guiding generally works by having a small telescope mounted on the side of the main telescope, with the camera feed going to some auto-guiding software, which needn't have any relationship at all with the main telescope software, it just needs to be able to adjust the motors. You then tell the auto-guiding software which star you want it to monitor, and it will monitor a small window of pixels around that star. As the star drifts, the software gives commands to the motors to tell them what to do, aiming to direct the star back to where it started. It is even possible to use this system to correct errors smaller than a single pixel by examining how the brightness drops off towards the edges of the star.
The reason to use a separate telescope for guiding is because the auto-guider needs to take images quite often, while the main telescope might be taking long exposures. You want the auto-guider to keep the image centred for the duration of the long exposure, so it needs to be able to examine pictures more often than the main telescope can supply them.
I don't want to mount a separate telescope on the side, and my telescope doesn't take exposures longer than 1 second anyway, so I am planning to auto-guide using the images from the main telescope.
2.1. Detecting the position of a star
So our first problem is we need an algorithm that, given an image and a window of pixels to examine, can identify the exact location of the star within the window of pixels.
It's always best to start with the stupidest thing that can possibly work, so my first thought was that we can just weight the pixels in the window by brightness, and then select the mean pixel location. This actually works adequately as long as the star is sufficiently bright relative to the background noise. It works slightly better if you weight the pixels by the square of the brightness. We could probably do even better if we detected the background noise level (perhaps the median brightness? or the 25th percentile brightness?) and subtracted it away, but I've not felt the need to do so.
The algorithm I use just looks like this:
xsum = 0, ysum = 0, total = 0
for y = 0 to height:
for x = 0 to width:
k = brightness(x, y) * brightness(x, y)
xsum += x * k
ysum += y * k
total += k
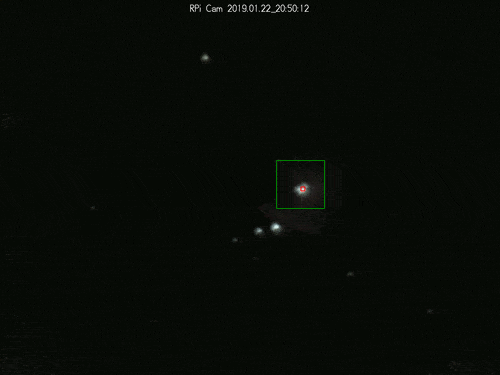
starlocation = (xsum / total, ysum / total)I wrote a small program to test this algorithm. It draws a green box around the window of pixels that it is examining, and a small red box (slightly hard to see) around the detected centre of the star:
Fig. 5: Auto-guiding test.
As you can see, the position of red box is spot on in every frame.
The coordinates of the green box are specified manually for the first frame, and then for every subsequent frame it centres the green box around where the star was detected to be in the previous frame.
The most important parameter is the size of the green box. If it is set too large the jitter can cause it to encompass additional stars, and then the location of the mean-square-brightness no longer corresponds to just the location of the star we want to track, so the guide position can change over time. Note how the red box starts out in the centre of the star and then moves away when the other star comes into the window:
Fig. 6: Auto-guiding test with window too large (cf. fig. 5).
We might be able to use some sort of clustering algorithm to throw away all but the central brightness peak, but I've not yet felt the need to do this either.
If the window size is too small the star could jitter out of the window and we could lose the auto-guiding entirely. This is much worse than what happens if the window is too large. I did try using the entire image as the window and it still seems to basically track the same point relative to the stars, so if in doubt it is always better to set the window too large than too small.
A good side effect of the existence of this test program is that we can now use it to align individual exposures for stacking! I haven't actually done that yet, but it should be as easy as taking the output star coordinates for each frame and writing a small shell script around imagemagick. That would remove the requirement for manual layer alignment, which is the most time-consuming part of my exposure stacking workflow.
2.2. Guiding the scope
Now that we can reliably detect a star in a user-defined window, we can compute the pixel distance between where the star is now and where it was when we started, and therefore how far we need to move it back. We then need to convert this pixel distance in to a step count in order to adjust the trim on the motors and keep the scope guiding correctly.
This is actually harder than it sounds because:
a.) It takes time for the trim commands to get to the scope, and we may get extra frames back from the camera that were taken with the old trim value. We don't want to keep adding offsets to the trim while this is happening, else we'll overshoot the target position.
b.) The number of steps per pixel is not constant on the azimuth axis. When the altitude motor is at 0° (horizontal), each step moves the image sideways by about 3px (at 500x375), but this distance gets smaller as the altitude motor is raised. When the altitude motor is at 90° (vertical), each step doesn't move the image sideways at all! It only rotates it around the centre.
c.) The scope is jittering in addition to drifting. We want to average out the effects of the jitter so that we aren't constantly banging the motors back and forth.
This sounds like a job for a PID controller, although I haven't yet implemented one. I have some hairy ad-hoc javascript based around some guessed magic numbers, like the minimum number of data points required, worst-case round-trip time between adjusting trim and seeing the adjustment in the images, maximum age of data point for calculating position, and number of steps per pixel. Maybe I'll write a PID controller one day.
2.3. User interface
Aside from auto-guiding, I've recently added various other pieces of real-time image processing to my fork of RPi Cam Web Interface. Mostly this is in aid of amplifying the brightness of very dim objects, but it was a convenient place to add the auto-guider. Happily, the same image processing that makes the star easier to see for the operator also makes the star easier to see for the auto-guider, although it may compromise sub-pixel precision if more pixels are clipped to maximum brightness.
Fig. 7: User interface with auto-guiding enabled.
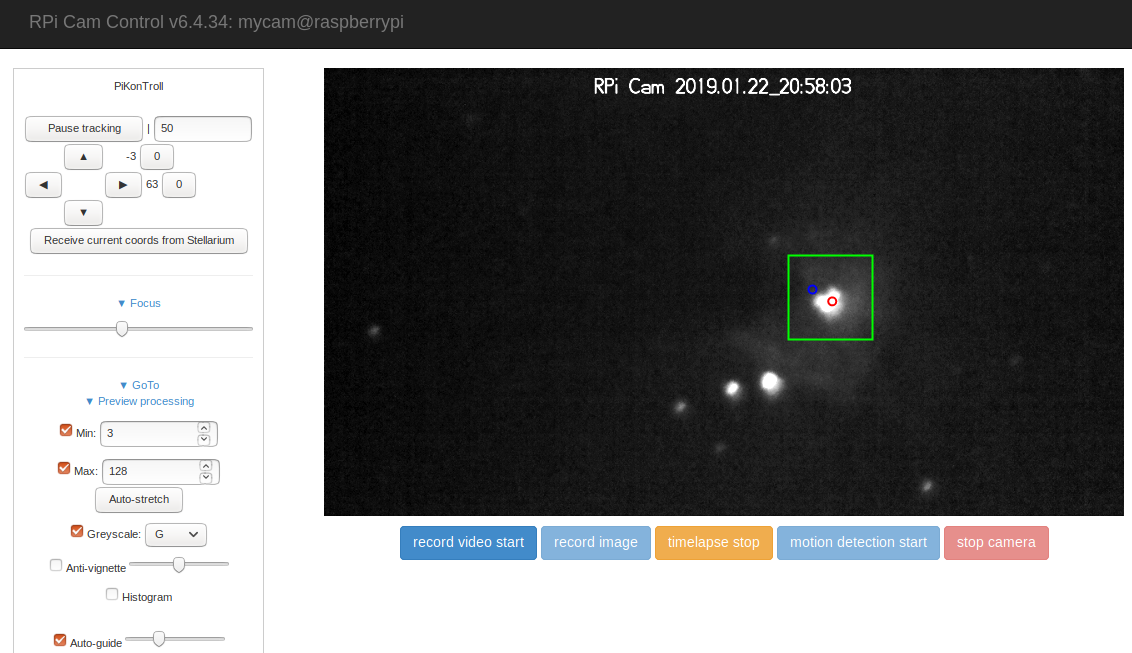
The checkbox at bottom left enables auto-guiding. Once it is checked, the mouse pointer turns into a crosshair and you have to click on a star in the image. This places the small blue circle. The blue circle never moves, and only serves to indicate the position that the auto-guider wants to move the star on to. The green box (sized according to the slider next to the checkbox) indicates the size and location of the window in which the auto-guider is looking for the star. The red circle indicates the current detected location of the star.
3. Measuring the improvement
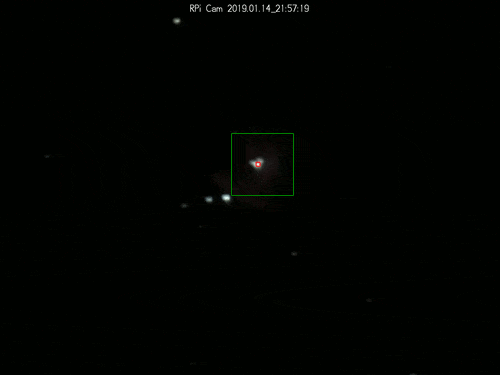
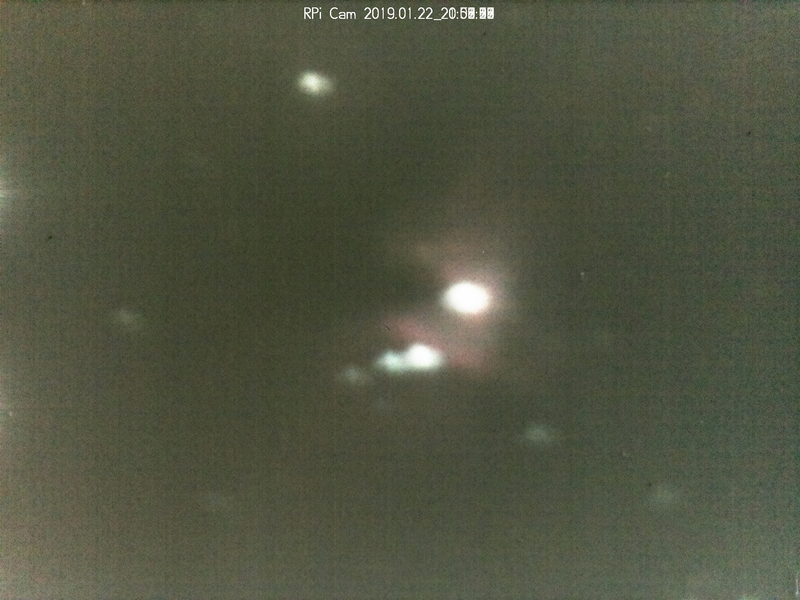
Last night I managed to get about 15 minutes of uninterrupted timelapse of the Orion nebula before it became too cloudy. This was an excellent opportunity to try out the auto-guider:
Fig. 8: Orion nebula with tracking and auto-guiding, 15 minutes (cf. fig. 2).
It works! The jitter is still there, but it's a substantial improvement on what we had before with un-guided tracking because the image no longer drifts in the frame over time.
I manually recorded the trim settings while it was auto-guiding:
Fig. 9: Trim settings while auto-guiding.
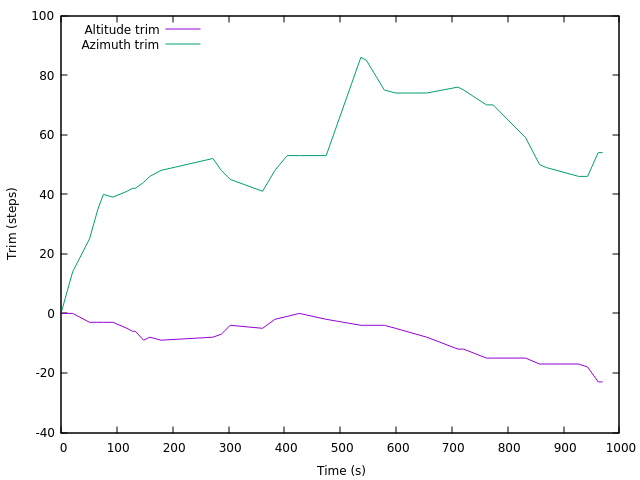
(I didn't record this very often, so high-frequency components, i.e. over-corrections, will be missing. I should add some automated logging).
We can see that the auto-guider has adjusted the altitude motor down over time, relative to where it would be from tracking alone, and it has adjusted the azimuth motor towards the right over time, relative to where it would be from tracking alone. That probably means the telescope was out of level, with the top leaning towards the left. The azimuth motor ended up trimmed by more than 50 steps away from where it started, which would manifest as a difference of about 140 pixels on the x axis of the image (at 500x375).
I used the auto-guiding test program to label the centre of the star in each frame, and produced an updated version of figure 3 with the auto-guiding data included:
Fig. 10: Tracking error with tracking off versus on versus auto-guided (cf. fig. 3).
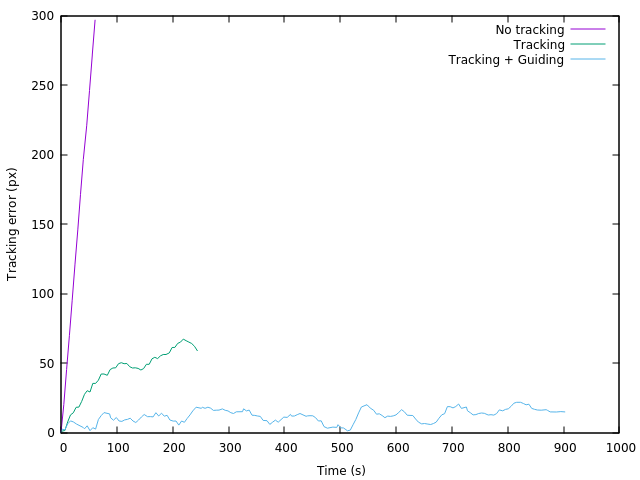
And indeed the slow drift over time from the "Tracking" case is gone, we just have some sources of jitter around the centre point. With the slow drift gone, we should now be able to track the same star all night long (modulo cloud cover), with no manual adjustment required. This is a great success.
We can also plot the mean (in the main bars) and standard deviations (in the "error bars") of the tracking errors in the 3 different cases:
Fig. 11: Comparison of tracking error distributions (smaller is better).
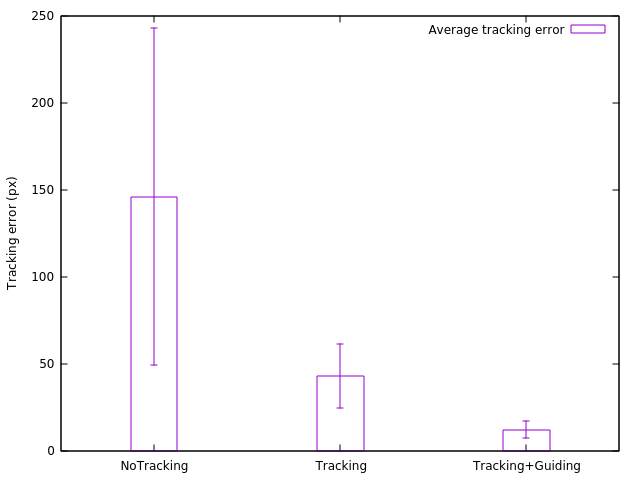
Also note that the error for the "NoTracking" and "Tracking" cases would presumably increase over time, and that the "Tracking+Guiding" data is based on a much longer timelapse. So probably this error distribution is understating how much of an improvement the auto-guider is.
4. Unaligned exposure stacking
Just for fun I tried stacking the exposures together without any alignment, to see what they look like in the three different cases. I also haven't subtracted any dark frames, so the background gets quite bright.
First we have no tracking:
Fig. 12: Unaligned stack of 13 frames with tracking off.
It's just a bunch of separate dots.
With tracking on it's a bit better:
Fig. 13: Unaligned stack of 50 frames with tracking on (cf. fig. 12).
It still clearly moved, but the basic shape is there. (I don't know why the background is so much darker here; possibly these images were taken with lower ISO setting).
With auto-guided tracking it's even better:
Fig. 14: Unaligned stack of 171 frames with tracking and auto-guiding (cf. fig. 13).
(But we'd still want to align them better than this for "real" stacking).